| Hidden Treasures | 您所在的位置:网站首页 › codes build a boat for treasure wiki fandom › Hidden Treasures |
Hidden Treasures
|
Introduction[]
There is a Hidden Treasure in almost every one of the first maps of the main story's chapters as well as every numbered Time Rift. You can claim each Treasure by having a unit under your control end their turn on the tile which contains the Treasure. Every map containing a Hidden Treasure is repeatable so it is not strictly necessary to collect each one during one's first clear of a map. Maps which contain a Hidden Treasure will show whether it has been collected or not. You must successfully clear the map in order to keep any Treasure collected. It is advisable to read each map's victory conditions so that you'll know if you can get the Hidden Treasure while completing the map. Certain advice is noted in italics in the description column for the reader's benefit. N.B. Any skill that refreshes a unit's turn (such as Strike, Chivalry, Wind Spiral, etc.) counts as having taken a turn so will claim the Treasure if used on the correct tile, allowing you to continue playing without having to sacrifice a unit's turn. N.B. It may be advisable to take a unit with teleport (Hein, Jessica) or one with the ability to summon a unit (e.g. Lana, Bozel - requires 1 runestone) in order to make collection of the treasures much easier without compromising the main objective of each map. A unit that is teleported onto a Treasure tile will collect the Treasure so is free to take their turn thereafter. Main Story Hidden Treasures[]Hidden Treasures of Part I of the Main Story. Chapter Map Location Reward Image Description Chapter 1 Lv1 (Prologue) Dovalu Village None N/A N/A Chapter 2 Lv3 (Iconoclastic Mage) Kalxath Forest 2 Friendship Vouchers 4 spaces left of and 1 space down from Angelica.
Chapter 3 Lv3 (A Wanted Trio)
Mishura Town
15 Trinity Crystals
4 spaces left of and 1 space down from Angelica.
Chapter 3 Lv3 (A Wanted Trio)
Mishura Town
15 Trinity Crystals
 At the top of the map to the right side of the house beyond the wall.
Chapter 4 Lv6 (Mightiest Knight)
Secluded Shack
1 Trinity Voucher
At the top of the map to the right side of the house beyond the wall.
Chapter 4 Lv6 (Mightiest Knight)
Secluded Shack
1 Trinity Voucher
 Fruit tree at the very top of the map on the right side of the house.
Chapter 5 Lv9 (Trial of Courage)
Floating City - Tiseo
R rank gear
Fruit tree at the very top of the map on the right side of the house.
Chapter 5 Lv9 (Trial of Courage)
Floating City - Tiseo
R rank gear
 Statue on the left side of the map.
Chapter 6 Lv10 (Help Me)
Floating City - Tiseo
None
N/A
N/A
Chapter 7 Lv12 (Secret... Realm!?)
Roga Valley
3 Friendship Vouchers
Statue on the left side of the map.
Chapter 6 Lv10 (Help Me)
Floating City - Tiseo
None
N/A
N/A
Chapter 7 Lv12 (Secret... Realm!?)
Roga Valley
3 Friendship Vouchers
 At the top of the map, 1 tile up from and 2 tiles left of Aniki Adon.
Chapter 8 Lv13 (A Dangerous Request)
Rocky Valley
SR Devout Coat
At the top of the map, 1 tile up from and 2 tiles left of Aniki Adon.
Chapter 8 Lv13 (A Dangerous Request)
Rocky Valley
SR Devout Coat
 Around the center of the map next to the mountains.
Chapter 9 Lv16 (Demonic Bloodline)
Crossroads
1 Rare Crafter's Hammer
Around the center of the map next to the mountains.
Chapter 9 Lv16 (Demonic Bloodline)
Crossroads
1 Rare Crafter's Hammer
 On the right-hand side of the map. It is on the north side of the river.
Chapter 10 Lv18 (Union Mercenaries)
Floating City - Tiseo
20 Trinity Crystals
On the right-hand side of the map. It is on the north side of the river.
Chapter 10 Lv18 (Union Mercenaries)
Floating City - Tiseo
20 Trinity Crystals
 On the right side of the map, 2 tiles to the right of the archer there.
Chapter 11 Lv19 (Smoke Signals)
Dovalu Village
1 Trinity Voucher
On the right side of the map, 2 tiles to the right of the archer there.
Chapter 11 Lv19 (Smoke Signals)
Dovalu Village
1 Trinity Voucher
 In the top-right of the map in the graveyard.
Chapter 12 Lv19 (Draconic Shadow)
Dark Cave
35 Trinity Crystals
In the top-right of the map in the graveyard.
Chapter 12 Lv19 (Draconic Shadow)
Dark Cave
35 Trinity Crystals
 In the bottom-left corner of the map.
Chapter 13 Lv22 (Dream of Flying)
Floating City - Tiseo
1 Rare Crafter's Hammer
In the bottom-left corner of the map.
Chapter 13 Lv22 (Dream of Flying)
Floating City - Tiseo
1 Rare Crafter's Hammer
 Chapter 14 Lv23 (Tough Choices)
Floating City - Tiseo
None
N/A
N/A
Chapter 15 Lv25 (Bloodstained Siege)
City of Carmen
SR Aristocratic Dagger
Chapter 14 Lv23 (Tough Choices)
Floating City - Tiseo
None
N/A
N/A
Chapter 15 Lv25 (Bloodstained Siege)
City of Carmen
SR Aristocratic Dagger
 At the far top-left of the map, inside the house.
This is a rout map with the added condition that you must protect McAvoy from death. He will charge the enemy head on so make sure to send a fast unit to collect the Treasure or use teleport. Chapter 16 Lv27 (Demon-Eyed Girl) Snowfield Camp None N/A N/A Chapter 17 Lv29 (Northern Bloodshed) Isskano Fortress SR Chain Helmet Image needed Chapter 18 Lv31 (Trial of Choice) Molzement Post 1 Trinity Voucher Chapter 19 Lv33 (Ashes to Ashes)
Swamp Island
50 Trinity Crystals
Chapter 19 Lv33 (Ashes to Ashes)
Swamp Island
50 Trinity Crystals
 The pile of dragon bones in the water
Chapter 20 Lv35 (Counterattack Horn)
Neaux City
SR Meditation Ring
Image needed
Chapter 21 LV36 (The Deciver's End)
Neaux City
2 Trinity Vouchers
The pile of dragon bones in the water
Chapter 20 Lv35 (Counterattack Horn)
Neaux City
SR Meditation Ring
Image needed
Chapter 21 LV36 (The Deciver's End)
Neaux City
2 Trinity Vouchers
 Image needed
The torch near Rag.
Chapter 22 Lv38 (Trial of Fate)
Acedru Ruins
60 Trinity Crystals Image needed
The torch near Rag.
Chapter 22 Lv38 (Trial of Fate)
Acedru Ruins
60 Trinity Crystals
 At the top, 2 tiles left of Ledin.
Chapter 23 Lv41 (Salvation of Ibbas)
Elis City
2 Rare Crafter's Hammers
At the top, 2 tiles left of Ledin.
Chapter 23 Lv41 (Salvation of Ibbas)
Elis City
2 Rare Crafter's Hammers
 On the center-right of the map, outside the city.
Chapter 24 Lv42 (Battle on the Bridge)
Gemini Crossing
SR Scorching Staff
On the center-right of the map, outside the city.
Chapter 24 Lv42 (Battle on the Bridge)
Gemini Crossing
SR Scorching Staff
 On the center-right of the map, 2 tiles left of and 1 tile down from Geier in the forest.
Chapter 25 Lv44 (Defensive Lifeline)
Emerald Gate
3 Trinity Vouchers
On the center-right of the map, 2 tiles left of and 1 tile down from Geier in the forest.
Chapter 25 Lv44 (Defensive Lifeline)
Emerald Gate
3 Trinity Vouchers
 On the bottom-right of the map, 2 tiles up from and 2 tiles left of Bozel.
Be careful of ending your turn inside Geier's range as killing him will end the map. Chapter 26 Lv46 (Bloody Rampart) Hyborea Fortress 80 Trinity Crystals In the moat below the castle. Five spaces up from Yulia.
Chapter 27 Lv48 (Alliance of Light)
Mira Port
3 Rare Crafter's Hammers
Image needed
Chapter 28 Lv50 (Battle of Cellier)
Imperial Ship
SR Magic Blade Sigma
In the moat below the castle. Five spaces up from Yulia.
Chapter 27 Lv48 (Alliance of Light)
Mira Port
3 Rare Crafter's Hammers
Image needed
Chapter 28 Lv50 (Battle of Cellier)
Imperial Ship
SR Magic Blade Sigma
 Image needed
Chapter 29 Lv51 (A Test of Tenacity)
Lake Temple
80 Trinity Crystals Image needed
Chapter 29 Lv51 (A Test of Tenacity)
Lake Temple
80 Trinity Crystals
 The black symbol underneath of Tiaris on her starting location, in front of the chair.
Chapter 30 Lv51 (Counter Strike)
Lake Temple
1 Epic Crafter's Hammers
Image needed
Armour suit in the bottom right corner. 1 Space up, 6 spaces to the right of Bodamicus.
Chapter 31 Lv52 (The Sanguine Plane)
Crimson Lake
150 Orichalcum Ore
The black symbol underneath of Tiaris on her starting location, in front of the chair.
Chapter 30 Lv51 (Counter Strike)
Lake Temple
1 Epic Crafter's Hammers
Image needed
Armour suit in the bottom right corner. 1 Space up, 6 spaces to the right of Bodamicus.
Chapter 31 Lv52 (The Sanguine Plane)
Crimson Lake
150 Orichalcum Ore
 On the bottom-right of the map, 2 spaces below the Orc.
Chapter 32 Lv53 (A Test of Strength)
Port Rimilia
80 Trinity Crystals
On the bottom-right of the map, 2 spaces below the Orc.
Chapter 32 Lv53 (A Test of Strength)
Port Rimilia
80 Trinity Crystals
 A rift in the mountain, right under Dietharte starting place.
Chapter 33 Lv54 (Desperate Stronghold)
Baldea Fortress
3 Trinity Vouchers
A rift in the mountain, right under Dietharte starting place.
Chapter 33 Lv54 (Desperate Stronghold)
Baldea Fortress
3 Trinity Vouchers
 Outside of the building on the right-hand side.
Chapter 34 Lv55 (Bloody Battle Cries)
Hyborea
2 Epic Crafter's Hammers
Outside of the building on the right-hand side.
Chapter 34 Lv55 (Bloody Battle Cries)
Hyborea
2 Epic Crafter's Hammers
 Image needed
The white cloth on the barricade 3 spaces down of Geier.
Chapter 35 Lv55 (Symphony of Light and Darkness)
Hyborea
None
N/A
N/A
Chapter 36 Lv56 (Love Songs in the Ruins)
Clarion Sentinel
SSR Galaxy Cloak Image needed
The white cloth on the barricade 3 spaces down of Geier.
Chapter 35 Lv55 (Symphony of Light and Darkness)
Hyborea
None
N/A
N/A
Chapter 36 Lv56 (Love Songs in the Ruins)
Clarion Sentinel
SSR Galaxy Cloak
 Near the top of the map in the water, a little bit below Feraquea's position.
Chapter 37 Lv57 (King of the Old Empire)
Ancient Ruins
100 Trinity Crystals
Near the top of the map in the water, a little bit below Feraquea's position.
Chapter 37 Lv57 (King of the Old Empire)
Ancient Ruins
100 Trinity Crystals
 Just inside the castle on the right side.
It is advised to collect this Treasure before challenging the top-most group of enemies including Bernhardt and Leon as killing Bernhardt will trigger a second phase of the fight, summoning a large number of enemies. Chapter 38 Lv57 (Shadow Cathedral) Hyborea Cathedral 3 Bursting Heart Keys In the top-left room where a vampire spawns.
Defeating Zerida will trigger the second phase of the fight where she will become massively empoiwered, as will the demons that spawn. However the map will only end once all foes are defeated so either keep her in her much less threatening first phase or be prepared to kill her in 2 turns as she has extremely high oneshot potential on any unit. Chapter 39 Lv58 (The Last Allied Force) Hyborea None N/A N/A Chapter 40 Lv58 (Infected Tyrant) Crescent Harbor 100 Trinity Crystals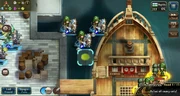 At the top of the map in the center.
Each former allied unit defeated will inflict a stacking debuff on all allied units, reducing ATK/INT and DEF by 10%, as well as reducing mobility by 1. It is highly recommended to bring a way to cleanse debuffs (healer with Dispel/Goddess Tear or Liana). Immunity to debuffs through skills such as Chivalry will be a great help. Any ability that grants the ability to move again within a certain number of spaces (Chivalry/Strike/Wind Spiral/Epic Knight) will be unaffected by the mobility reduction. The mobility reduction will cause tanks to be unable to guard. Hag has a global single target nuke that does a large amount of damage. Do not leave any unit on low health. Chapter 41 Lv59 (Disguised Sorceress Queen) Rand Town 100,000 Gold In the bottom-left of the town below Feraquea's position.
Chapter 42 Lv59 (Soulbound Fortress)
Ark Fortress
150 Orichalcum Ore
In the bottom-left of the town below Feraquea's position.
Chapter 42 Lv59 (Soulbound Fortress)
Ark Fortress
150 Orichalcum Ore
 In the isolated top-left room
Chapter 43 Lv60 (Insects Under the City)
Hyborea
SSR Holy Ring
In the isolated top-left room
Chapter 43 Lv60 (Insects Under the City)
Hyborea
SSR Holy Ring
 Far right of the stage.
Chapter 44 Lv60 (Boarding War)
Temporary Airport
100 Trinity Crystals
Far right of the stage.
Chapter 44 Lv60 (Boarding War)
Temporary Airport
100 Trinity Crystals
 Middle right below the objective.
Chapter 45 Lv60 (Crossing the Strait)
Dilis Strait
150 Orichalcum Ore
Middle right below the objective.
Chapter 45 Lv60 (Crossing the Strait)
Dilis Strait
150 Orichalcum Ore
 Top Center.
Map ends on boss defeat so it's hard to miss. All the tiles where the boss is standing are city walls so non-fliers will be slow to approach. Chapter 46 Lv60 (The Demon Capital) Demon Claw Fortress SSR Carbon Fiber Helm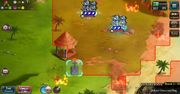 Bottom Left.
Chapter 47 Lv60 (Trial of Hope)
Sealed Hall
2 Trinity Vouchers
Bottom Left.
Chapter 47 Lv60 (Trial of Hope)
Sealed Hall
2 Trinity Vouchers
 Middle Left.
Interlude Act 1 Lv60 (Spirit of Langrisser I)
City of Carmen
120,000 Gold
Middle Left.
Interlude Act 1 Lv60 (Spirit of Langrisser I)
City of Carmen
120,000 Gold
 Middle right.
Interlude Act 2 Lv60 (Spirit of Langrisser II)
Isskano Fortress
2 Trinity Vouchers
Middle right.
Interlude Act 2 Lv60 (Spirit of Langrisser II)
Isskano Fortress
2 Trinity Vouchers
 Crack at bottom wall of fort.
Interlude Act 3 Lv60 (Spirit of Langrisser III)
Hyborea Fortress
3 Bursting Heart Keys
Crack at bottom wall of fort.
Interlude Act 3 Lv60 (Spirit of Langrisser III)
Hyborea Fortress
3 Bursting Heart Keys
 Middle right.
There are two reinforcement waves. Once they are killed the map ends. Interlude Act 4 Lv60 (Spirit of Langrisser IV) Crimson Lake 100 Trinity Crystals On the boat at the top left.
Interlude Act 5 Lv60 (Spirit of Langrisser V)
Hyborea
SSR Olver's Staff
On the boat at the top left.
Interlude Act 5 Lv60 (Spirit of Langrisser V)
Hyborea
SSR Olver's Staff
 Middle left.
Chapter 48 Lv60 (Demon Slash Strike)
Demon City Gate
3 Bursting Heart Keys
Middle left.
Chapter 48 Lv60 (Demon Slash Strike)
Demon City Gate
3 Bursting Heart Keys
 Top right.
After killing the main enemies they will revive at the top and be immune to direct damage. Once killing all four they will need to be fought again. They will be heavily buffed and get another action if they don't attack in a turn, meaning they approach quickly. Chapter 49 Lv60 (Dark Prince) Velzeria City None N/A N/A Chapter 50 Lv60 (Meeting in the Eye of Chaos) Velzeria City None N/A N/A Time Rift Hidden Treasures[]Table made based upon info compiled into top spreadsheet. All credit to original creator. You can click each image for a larger higher resolution version. Map Reward Image Description Map Reward Image Description Time Rift 1 - Langrisser II: Journey of the Light 1-1 15 Trinity Crystals The cabinet 1 tile up from and 1 tile right of Liana's position.
Be careful not to end your turn inside of Baldo's range as he will suicide and end the map. 1-1 Elite 25 Trinity Crystals Outside of the house Liana is in, to the right side.
Be careful not to end your turn inside of Baldo's range as he will suicide and end the map. 1-2 SR Speed Boots The stone 1 tile left of the bridge.
1-2 Elite
1 Trinity Voucher
The stone 1 tile left of the bridge.
1-2 Elite
1 Trinity Voucher
 At the far top-right of the map.
1-3
3 Friendship Vouchers
At the far top-right of the map.
1-3
3 Friendship Vouchers
 The blue flame in the top right corner.
A unit will have to walk around the wall to claim this Treasure, which will slow your advance towards the bottom of the map. If you are too slow, Cherie will attack Zorum and Morgan alone and die, failing the Feat. 1-3 Elite 3 Friendship Vouchers In the top-left corner of the map.
A unit will have to walk around the wall to claim this Treasure, which will slow your advance towards the bottom of the map. If you are too slow, Cherie will attack Zorum and Morgan alone and die, failing the Feat. 1-4 1 Trinity Voucher Image needed The blug flag on top of the map. 1-4 Elite 1 Rare Crafter's Hammer In the center of the map on the mountains, 4 tiles down from Vargas.
1-5
1 Trinity Voucher
In the center of the map on the mountains, 4 tiles down from Vargas.
1-5
1 Trinity Voucher
 Mountain rift look like a break on the right side.
1-5 Elite
1 Trinity Voucher
Image needed
1-6
SR Life Staff
Mountain rift look like a break on the right side.
1-5 Elite
1 Trinity Voucher
Image needed
1-6
SR Life Staff
 At the very top of the map, 1 tile up from and 1 tile right of the Undead Emperor.
1-6 Elite
30 Trinity Crystals
Image needed
1-7
30 Trinity Crystals
At the very top of the map, 1 tile up from and 1 tile right of the Undead Emperor.
1-6 Elite
30 Trinity Crystals
Image needed
1-7
30 Trinity Crystals
 At the very top right of the map in the graveyard.
Two enemy units will spawn in the graveyard at the top upon entering it. 1-7 Elite 1 Rare Martial Spirit Image needed Time Rift 2 - Langrisser II: Langrisser and Alhazard 2-1 25 Trinity Crystals On the other side of the bridge on a cliff tile, next to the upper mage general.
Killing Kramer ends the map. He is grouped with the two mages. All 3 aggro together if you end turn within any one's range. Cliff tiles are only accessible by fliers so you will need to use one to collect this Treasure. 2-1 Elite 35 Trinity Crystals Image needed 2-2 SR Swift Helmet In the water, a short ways north-east of your team's starting position
2-2 Elite
1 Trinity Voucher
Image needed
2-3
1 Rare Crafter's Hammer
In the water, a short ways north-east of your team's starting position
2-2 Elite
1 Trinity Voucher
Image needed
2-3
1 Rare Crafter's Hammer
 At the top of the map, outside of the castle.
The Treasure tile is located very near to Vargas' spawn position. Use a unit capable of fighting and killing Vargas alone to seize the Treasure thereafter. 2-3 Elite 1 Rare Crafter's Hammer Image needed 2-4 SR Greaves Above your team's starting position in the top-right corner.
Elwin will naturally path to the Langrisser through the gap in the wall in the center of the map. Leon spawns on the far left-hand side of the map. It is recommended to teleport a fast unit (such as a flier or cavalier) to collect this Treasure as they will have the movement to rejoin the fight in time to collect the Feat for defeating Leon. 2-4 Elite 35 Trinity Crystals Image needed 2-5 30 Trinity Crystals To the far left of the allied team's starting position.
2-5 Elite
SR Dragon Scale Armor
Image needed
2-6
35 Trinity Crystals
To the far left of the allied team's starting position.
2-5 Elite
SR Dragon Scale Armor
Image needed
2-6
35 Trinity Crystals
 In the top-left corner of the map, 3 tiles left of and 1 tile down from Bozel's position.
A unit with 5 Mobility can attack Bozel from his left side, collecting the Feat for killing him and then collect the Treasure on the subsequent turn. 2-6 Elite 40 Trinity Crystals Image needed 2-7 SR Dragon Scale Armor Image needed 2-7 Elite 1 Trinity Voucher Image needed Time Rift 3 - Langrisser II: Glorious Legend 3-1 35 Trinity Crystals Image needed 3-1 Elite 2 Rare Crafter's Hammers Image needed 3-2 1 Trinity Voucher Image needed 3-2 Elite 45 Trinity Crystals In the very bottom-right of the map.
A unit that ends their turn on this tile will be in range of Lana if you have not defeated her yet so make sure said unit can take a Dark Reaper to the face. 3-3 1 Rare Crafter's Hammer Image needed 3-3 Elite SR Ghost Robe On the right side of the map, 2 tiles below Egbert.
The route to this Treasure will take you outside of the main structure. Only send a single unit capable of defeating Egbert alone or you may find yourself shorthanded elsewhere. 3-4 SR Feathered Light Armor Image needed 3-4 Elite 45 Trinity Crystals Inside the temple in the bottom-left corner.
3-5
40 Trinity Crystals
Inside the temple in the bottom-left corner.
3-5
40 Trinity Crystals
 Top-left corner
3-5 Elite
1 Trinity Voucher
Top-left corner
3-5 Elite
1 Trinity Voucher
 Bottom of the river, below the bridge middle of the map.
3-6
1 Trinity Voucher
Image needed
3-6 Elite
2 Rare Crafter's Hammers
Bottom of the river, below the bridge middle of the map.
3-6
1 Trinity Voucher
Image needed
3-6 Elite
2 Rare Crafter's Hammers
 In the top left structure, to the left of the fliers.
Leon and the 2 fliers at the top are grouped separately from the rest of the Blue Dragon Knights. If you do not place any of your units within their range, this will give you time to fight the rest of the Knights and take the Treasure. 3-7 1 Rare Crafter's Hammer Image needed 3-7 Elite 45 Trinity Crystals On the center-left of the map, 2 tiles left of the archer.
The map will end upon killing Bernhardt. Grab the Treasure and kill all other units if you are able to for the Feat. As general guidance, be aware that Leon will appear at the bottom of the map at the start of turn 3. He will have great reach with his 5 movement and Chivalry. Be prepared to deal with him. Time Rift 4 - Langrisser II: Another Path 4-1 1 Trinity Voucher Image needed 4-1 Elite SR Elven Bow Image needed 4-2 SR Ghost Mask Image needed 4-2 Elite 45 Trinity Crystals Image needed 4-3 45 Trinity Crystals Image needed 4-3 Elite 1 Trinity Voucher Image needed 4-4 2 Trinity Vouchers Image needed 4-4 Elite 2 Rare Crafter's Hammers Image needed 4-5 50 Trinity Crystals Image needed 4-5 Elite 50 Trinity Crystals Image needed 4-6 2 Trinity Vouchers Image needed 4-6 Elite SR Scryer Image needed 4-7 SR Mithril Armor Image needed 4-7 Elite 50 Trinity Crystals Image needed Time Rift 5 - Langrisser II: The Empire's Honor 5-1 50 Trinity Crystals Image needed 5-1 Elite 1 Trinity Voucher Image needed 5-2 1 Trinity Voucher Image needed 5-2 Elite 3 Rare Crafter's Hammers Image needed 5-3 1 Rare Crafter's Hammer Image needed 5-3 Elite 60 Trinity Crystals Image needed 5-4 SR Crystal Anklet Image needed 5-4 Elite SR Feathered Hat Image needed 5-5 60 Trinity Crystals Image needed 5-5 Elite 60 Trinity Crystals Image needed 5-6 2 Trinity Vouchers Image needed 5-6 Elite 1 Trinity Voucher Image needed 5-7 2 Rare Crafter's Hammers Image needed 5-7 Elite 1 Epic Crafter's Hammer Image needed Time Rift 6 - Langrisser I: The Sworn Prince 6-1 2 Trinity Vouchers Image needed 6-1 Elite 70 Trinity Crystals Image needed 6-2 60 Trinity Crystals Image needed 6-2 Elite SR Sentinel Emblem Image needed 6-3 2 Rare Crafter's Hammers Image needed 6-3 Elite 70 Trinity Crystals Image needed 6-4 SR Rune Axe Image needed 6-4 Elite 1 Trinity Voucher Image needed 6-5 2 Rare Crafter's Hammers Image needed 6-5 Elite 2 Epic Crafter's Hammers Image needed 6-6 SR Assault Ring Image needed 6-6 Elite 80 Trinity Crystals Image needed Time Rift 7 - Langrisser I: Imperial Crusade 7-1 60 Trinity Crystals Image needed 7-1 Elite 80 000 Gold Image needed 7-2 2 Trinity Vouchers Image needed 7-2 Elite 2 Trinity Vouchers Image needed 7-3 1 Epic Crafter's Hammer Image needed 7-3 Elite 80 Trinity Crystals Image needed 7-4 60 Trinity Crystals Image needed 7-4 Elite SSR Twilight Armor Image needed 7-5 50 000 Gold Image needed 7-5 Elite 80 Trinity Crystals Image needed 7-6 1 Epic Crafter's Hammer Image needed 7-6 Elite 100 Orichalcum Ore Image needed 7-7 100 Orichalcum Ore Image needed 7-7 Elite 2 Epic Crafter's Hammers Image needed Time Rift 8 - Langrisser I: End of Darkness 8-1 2 Trinity Vouchers Image needed 8-1 Elite 2 Trinity Vouchers Image needed 8-2 SSR Aeneas' Helmet Image needed 8-2 Elite 80 Trinity Crystals Image needed 8-3 70 Trinity Crystals Image needed 8-3 Elite 3 Epic Crafter's Hammers Image needed 8-4 1 Epic Crafter's Hammer Image needed 8-4 Elite 90 000 Gold Image needed 8-5 70 000 Gold Image needed 8-5 Elite 1 Epic Material Spirit Image needed 8-6 2 Trinity Vouchers Image needed 8-6 Elite 2 Trinity Vouchers Image needed 8-7 70 Trinity Crystals Image needed 8-7 Elite 80 Trinity Crystals Image needed Time Rift 9 - Langrisser III: The First Knight 9-1 1 Epic Crafter's Hammer Image needed 9-1 Elite 90 000 Gold On the right side of the map 1 tile up from and 2 tiles right of Varna.
You will need to use a flier to cross the gap in the center in order to reach this Treasure. 9-2 70 000 Gold Image needed 9-2 Elite 3 Epic Crafter's Hammers On the right side of the map outside of the city, 4 tiles below Dios.
9-3
150 Orichalcum Ore
Image needed
9-3 Elite
150 Orichalcum Ore
On the right side of the map outside of the city, 4 tiles below Dios.
9-3
150 Orichalcum Ore
Image needed
9-3 Elite
150 Orichalcum Ore
 The gravestone 5 tiles left of Grove.
9-4
SSR Dark Crown
Image needed
9-4 Elite
80 Trinity Crystals
The gravestone 5 tiles left of Grove.
9-4
SSR Dark Crown
Image needed
9-4 Elite
80 Trinity Crystals
 The bird's nest 2 tiles left of Geier.
The Treasure is positioned on a cliff tile. You will need to use a flier to grab it. The map ends when all enemy units apart from Geier die. Leaving a ballista alive is most likely the easiest way to get the Treasure. 9-5 70 Trinity Crystals Image needed 9-5 Elite 90 000 Gold On the edge of the forest on the bottom-left of the map, 4 tiles left of and 1 tile down from Emerick.
9-6
80 000 Gold
Image needed
9-6 Elite
3 Epic Crafter's Hammers
On the edge of the forest on the bottom-left of the map, 4 tiles left of and 1 tile down from Emerick.
9-6
80 000 Gold
Image needed
9-6 Elite
3 Epic Crafter's Hammers
 On the left-hand side of the map, 1 tile below the leftmost allied lancer unit.
9-7
2 Epic Crafter's Hammers
Image needed
9-7 Elite
1 Epic Martial Spirit
On the left-hand side of the map, 1 tile below the leftmost allied lancer unit.
9-7
2 Epic Crafter's Hammers
Image needed
9-7 Elite
1 Epic Martial Spirit
 In the far bottom-right of the city, 3 tiles left of and 1 tile down from the flier in the corner.
9-8
2 Trinity Vouchers
Image needed
9-8 Elite
80 Trinity Crystals
In the far bottom-right of the city, 3 tiles left of and 1 tile down from the flier in the corner.
9-8
2 Trinity Vouchers
Image needed
9-8 Elite
80 Trinity Crystals
 Outside of the Lushiris Gate on the bottom side tucked against the wall.
It may be advisable to use a unit that can move freely over the water (any flier/aquatic unit) to collect this Treasure due to the pressure of the flame wave from the West. 9-9 70 Trinity Crystals Image needed 9-9 Elite 2 Trinity Vouchers Image needed Time Rift 10 - Langrisser III: Lushiris Gate 10-1 2 Epic Crafter's Hammers Image needed 10-1 Elite 100 000 Gold In the top left of the map next to the small lava pool.
10-2
80 Trinity Crystals
Image needed
10-2 Elite
4 Epic Crafter's Hammers
In the top left of the map next to the small lava pool.
10-2
80 Trinity Crystals
Image needed
10-2 Elite
4 Epic Crafter's Hammers
 To the right of the team's starting position, next to the river.
Upon crossing the bridge, several sets of ambush spawns will appear. It is advised to have units ready to attack the 3 Demons that spawn in the bottom left. Several aquatic units will spawn in the bottom-right, very close to the Treasure. One should collect this Treasure before triggering the spawns. 10-3 2 Trinity Vouchers Image needed 10-3 Elite 150 Orichalcum Ore On the far right-hand side of the map, near to Fauvel.
It is easy to collect this Treasure after clearing all of the units around Fauvel's position as Emerick's group will spawn later in to the map from behind and Emerick himself will take a while to wear down. There is no rush to get to the Treasure tile. 10-4 150 Orichalcum Ore Image needed 10-4 Elite 90 Trinity Crystals Image needed Middle room on the right 10-5 90 000 Gold Image needed 10-5 Elite 100 000 Gold Image needed 10-6 80 Trinity Crystals Image needed 10-6 Elite 4 Epic Crafter's Hammers In the top right of the map amongst the cavaliers there.
10-7
3 Epic Crafter's Hammers
Image needed
10-7 Elite
90 Trinity Crystals
Image needed
10-8
SSR Oath of Justice
Image needed
10-8 Elite
1 Epic Martial Spirit
Image needed
10-9
2 Trinity Vouchers
In the top right of the map amongst the cavaliers there.
10-7
3 Epic Crafter's Hammers
Image needed
10-7 Elite
90 Trinity Crystals
Image needed
10-8
SSR Oath of Justice
Image needed
10-8 Elite
1 Epic Martial Spirit
Image needed
10-9
2 Trinity Vouchers
 Fruit tree at the top left of the map just east of the forest.
10-9 Elite
2 Trinity Vouchers
Image needed
Time Rift 11 - Langrisser III: Birth of the Holy Blade
11-1
80 Trinity Crystals
Image needed
11-1 Elite
100,000 Gold
Image needed
11-2
4 Epic Crafter's Hammers
Image needed
11-2 Elite
4 Epic Crafter's Hammers
Image needed
11-3
2 Trinity Vouchers
Image needed
11-3 Elite
150 Orichalcum Ore
Image needed
11-4
100 Trinity Crystals
Image needed
11-4 Elite
100 Trinity Crystals
Image needed
11-5
150 Orichalcum Ore
Image needed
11-5 Elite
100,000 Gold
Image needed
11-6
100,000 Gold
Image needed
11-6 Elite
4 Epic Crafter's Hammers
Image needed
11-7
4 Epic Crafter's Hammers
Image needed
11-7 Elite
1 Epic Martial Spirit
Image needed
11-8
SSR Veil of Light
Image needed
11-8 Elite
100 Trinity Crystals
Image needed
11-9
2 Trinity Vouchers
Image needed
11-9 Elite
2 Trinity Vouchers
Image needed
Time Rift 12 - Langrisser IV: Beginning of the Legend
12-1
Image needed
12-1 Elite
150,000 Gold
Image needed
Top left area tile with crack.
12-2
Image needed
12-2 Elite
Image needed
12-3
Image needed
12-3 Elite
Image needed
12-4
Image needed
12-4 Elite
Image needed
12-5
Image needed
12-5 Elite
Image needed
12-6
Image needed
12-6 Elite
Image needed
12-7
Image needed
12-7 Elite
Image needed
12-8
Image needed
12-8 Elite
Image needed
12-9
Image needed
12-9 Elite
Image needed
Fruit tree at the top left of the map just east of the forest.
10-9 Elite
2 Trinity Vouchers
Image needed
Time Rift 11 - Langrisser III: Birth of the Holy Blade
11-1
80 Trinity Crystals
Image needed
11-1 Elite
100,000 Gold
Image needed
11-2
4 Epic Crafter's Hammers
Image needed
11-2 Elite
4 Epic Crafter's Hammers
Image needed
11-3
2 Trinity Vouchers
Image needed
11-3 Elite
150 Orichalcum Ore
Image needed
11-4
100 Trinity Crystals
Image needed
11-4 Elite
100 Trinity Crystals
Image needed
11-5
150 Orichalcum Ore
Image needed
11-5 Elite
100,000 Gold
Image needed
11-6
100,000 Gold
Image needed
11-6 Elite
4 Epic Crafter's Hammers
Image needed
11-7
4 Epic Crafter's Hammers
Image needed
11-7 Elite
1 Epic Martial Spirit
Image needed
11-8
SSR Veil of Light
Image needed
11-8 Elite
100 Trinity Crystals
Image needed
11-9
2 Trinity Vouchers
Image needed
11-9 Elite
2 Trinity Vouchers
Image needed
Time Rift 12 - Langrisser IV: Beginning of the Legend
12-1
Image needed
12-1 Elite
150,000 Gold
Image needed
Top left area tile with crack.
12-2
Image needed
12-2 Elite
Image needed
12-3
Image needed
12-3 Elite
Image needed
12-4
Image needed
12-4 Elite
Image needed
12-5
Image needed
12-5 Elite
Image needed
12-6
Image needed
12-6 Elite
Image needed
12-7
Image needed
12-7 Elite
Image needed
12-8
Image needed
12-8 Elite
Image needed
12-9
Image needed
12-9 Elite
Image needed
|
【本文地址】